
6.6 KiB
GREE Controller — Home Assistant add-on
Repozytorium: https://git.linuxiarz.pl/gru/gree-controller-ha-addon/
Obraz OCI: zot.linuxiarz.pl/gree-controller:<version>
PL
Instalacja
W Home Assistant dodaj jako własne repozytorium:
https://git.linuxiarz.pl/gru/gree-controller-ha-addon/
Odśwież sklep dodatków/aplikacji i zainstaluj GREE Controller. config.yaml wskazuje gotowy wieloarchitekturowy obraz OCI; jego tag musi być równy polu version.
Sieć, VLAN i discovery
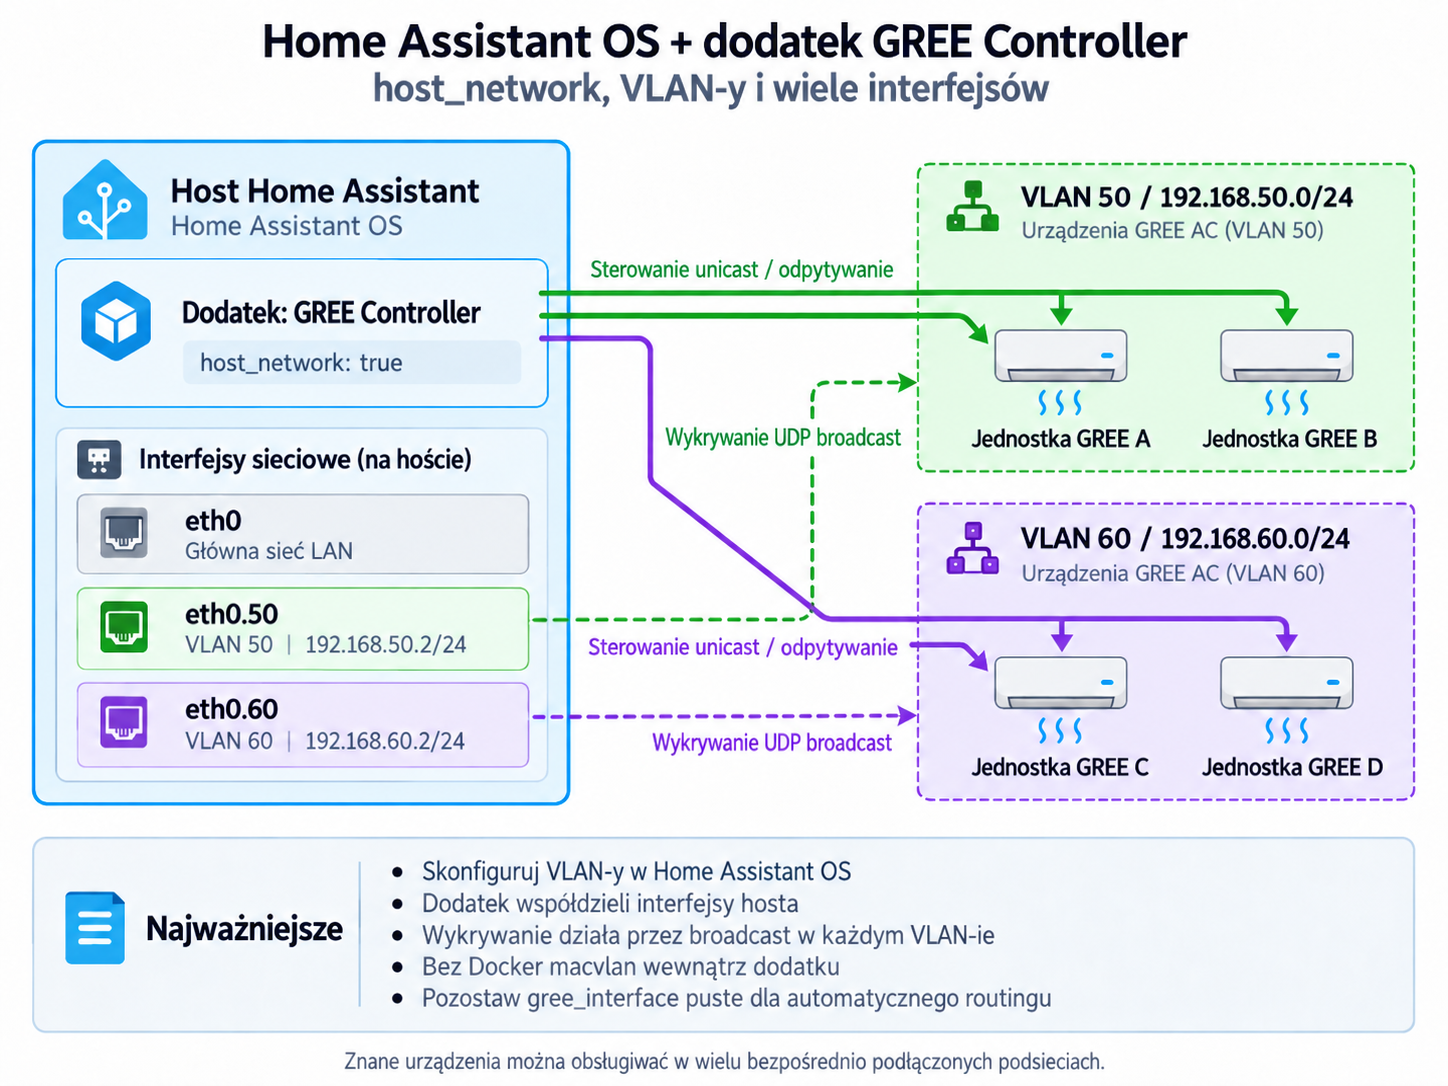
Dodatek celowo używa host_network: true, więc korzysta bezpośrednio z interfejsów hosta Home Assistant OS. Nie twórz dla niego Docker macvlan.
Interfejsy hosta:
ha network info
Przykład VLAN 50 na eth0, bez dodatkowej bramy domyślnej:
ha network vlan eth0 50 \
  --ipv4-method static \
  --ipv4-address 192.168.50.2/24 \
  --ipv6-method disabled
Dla jednej sieci GREE ustaw gree_interface na nazwę interfejsu (np. eth0.50) albo jego lokalny IPv4 (np. 192.168.50.2) oraz discovery_broadcast na broadcast tej podsieci, np. 192.168.50.255:7000.
Dla wielu bezpośrednio podłączonych podsieci pozostaw gree_interface puste. Kontroler dobiera lokalny interfejs najlepiej pasujący do IP znanego urządzenia. Discovery nadal wysyła jeden broadcast na skan, więc każdą podsieć/VLAN skanuj osobno, zmieniając discovery_broadcast, albo dodaj znane urządzenia ręcznie.
Broadcast zwykle nie przechodzi przez router. Sterowanie unicast może działać przez routing/firewall, jeżeli UDP jest dozwolone. Gdy urządzenia są w routowanym VLAN-ie, zapewnij hostowi HA interfejs w tej sieci, relay broadcast UDP albo wykonuj discovery lokalnie dla każdej podsieci.
Opcje
| Opcja | Znaczenie |
|---|---|
gree_interface |
interfejs lub lokalny IPv4; puste = automatyczny dobór trasy |
discovery_broadcast |
cel discovery UDP, np. 192.168.50.255:7000 |
simulate |
praca bez fizycznych urządzeń |
auto_seed |
przykładowe urządzenie w pustej bazie symulatora |
poll_interval_seconds |
interwał odpytywania urządzeń |
zone_interval_seconds |
interwał sterowania strefami/termostatem |
discovery_timeout_ms |
timeout discovery UDP |
app_token |
opcjonalna ochrona bezpośredniego Web UI/API |
log_level |
error, warn, info, debug, trace |
Home Assistant API
Dodatek korzysta automatycznie z wewnętrznego proxy Home Assistant Core (http://supervisor/core/api/) i tokenu SUPERVISOR_TOKEN przekazywanego przez Supervisor. Gdy token jest wykryty, UI pokazuje automatyczną autoryzację i ukrywa ręczne pola URL/token. Dopiero nieudany Test HA odblokowuje awaryjny ręczny fallback. Token Supervisor jest używany tylko w pamięci procesu i nie jest zapisywany w SQLite.
Dostęp, dane i bezpieczeństwo
Usługa słucha na TCP 8787; ingress Home Assistant przekazuje Web UI na ten port. Jeżeli 8787 jest osiągalny z niezaufanej sieci, ustaw app_token albo zablokuj port firewallem. Baza jest zapisywana w /data/gree-controller.db; konfiguracja używa backup: cold, więc dane są objęte backupem dodatku.
Watchdog sprawdza /api/health. Do diagnostyki sieci najpierw sprawdź ha network info, poprawność gree_interface, broadcast konkretnej podsieci i reguły UDP/firewalla.
EN
Installation
Add this custom repository in Home Assistant:
https://git.linuxiarz.pl/gru/gree-controller-ha-addon/
Refresh the app/add-on store and install GREE Controller. config.yaml points to a pre-built multi-architecture OCI image; its tag must match version.
Networking, VLANs and discovery
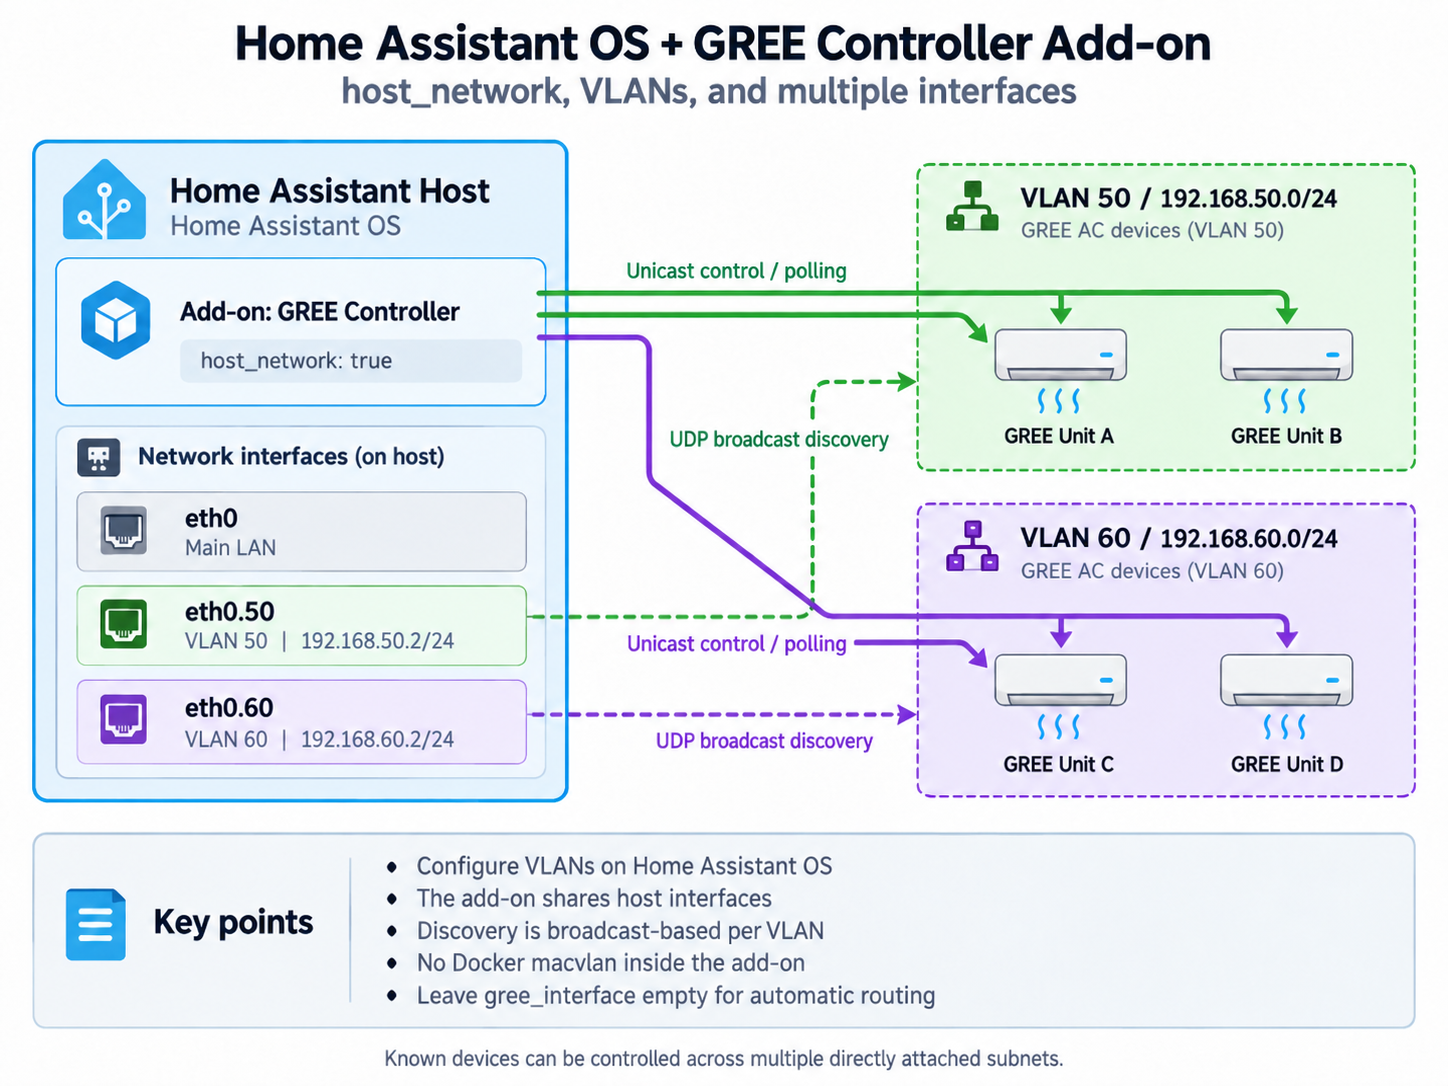
The add-on intentionally uses host_network: true, so it uses the Home Assistant OS host interfaces directly. Do not attach a Docker macvlan network to the add-on.
Inspect host interfaces with:
ha network info
Example VLAN 50 on eth0, without adding another default gateway:
ha network vlan eth0 50 \
  --ipv4-method static \
  --ipv4-address 192.168.50.2/24 \
  --ipv6-method disabled
For one GREE subnet, set gree_interface to the host interface name (for example eth0.50) or its local IPv4 address (for example 192.168.50.2), and set discovery_broadcast to that subnet broadcast, e.g. 192.168.50.255:7000.
For multiple directly attached subnets, leave gree_interface empty. The controller selects the local interface that best matches a known device IP. Discovery still sends one broadcast per scan, so scan each VLAN/subnet separately by changing discovery_broadcast, or add known devices manually.
Broadcast normally does not cross routers. Unicast control may work through routing/firewall rules when UDP is allowed. For routed GREE VLANs, give the HA host an interface in the VLAN, use a suitable UDP broadcast relay, or perform discovery locally per subnet.
Options
| Option | Meaning |
|---|---|
gree_interface |
interface or local IPv4; empty = automatic route selection |
discovery_broadcast |
UDP discovery target, e.g. 192.168.50.255:7000 |
simulate |
run without physical devices |
auto_seed |
create a sample device in an empty simulator database |
poll_interval_seconds |
device polling interval |
zone_interval_seconds |
thermostat/zone control interval |
discovery_timeout_ms |
UDP discovery timeout |
app_token |
optional protection for direct Web UI/API access |
log_level |
error, warn, info, debug, trace |
Home Assistant API
The add-on automatically uses the internal Home Assistant Core proxy (http://supervisor/core/api/) and the runtime SUPERVISOR_TOKEN provided by Supervisor. When the token is detected, the UI shows automatic authorization and hides manual URL/token fields. A failed Test HA unlocks the optional manual fallback. The Supervisor token is used only at runtime and is not stored in SQLite.
Access, data and security
The service listens on TCP 8787; Home Assistant ingress proxies the Web UI to that port. If 8787 is reachable from an untrusted network, configure app_token or block the port at the firewall. The database is stored in /data/gree-controller.db; backup: cold keeps it in the add-on backup.
The watchdog checks /api/health. For network troubleshooting, verify ha network info, gree_interface, the selected subnet broadcast, and UDP/firewall rules first.